Term Project
Table of contents
Introduction
In this project, we would like to expand our little experiment with TUN/TAP interfaces to implement our own VPN protocol. We will call this protocol WireChild since it is a childish version of WireGuard. By doing this exercise, we will have to contend with the complexities of secure-by-design network protocols. We will forgo strong cryptography for the ease of implementation of a simple xor-based algorithm. Therefore, our security analysis will start with the fact that cryptography for this protocol sucks. However, this is a networking project more than a cryptography project!
Learning Objectives
At the end of this project, you should be able to:
Iteratively design a networking protocol to satisfy security and reliability requirements.
Implement client-side and server-side applications to tunnel network traffic.
Analyze a given protocol for security vulnerabilities and suggest remedies.
Logistics
I have created a starter docker configuration for the project in the Project directory in the csse341-labs repository. It contains a configured docker-compose.yml template to set up the network topology with all the required tools.
Under the volumes/ directory, you will find starter code that creates TUN/TAP interfaces in the C programming language. I chose to use C because it makes bit mangling when handling packets a lot easier. However, you are free to use the python demo we did in class to write your project in python.
I am not familiar (nor do I wish to be) with bit mangling operations in python. So if you chose to use python, we will be exploring things together when you have implementation-specific questions.
Network Topology
For this project, we will be working with the following network topology:
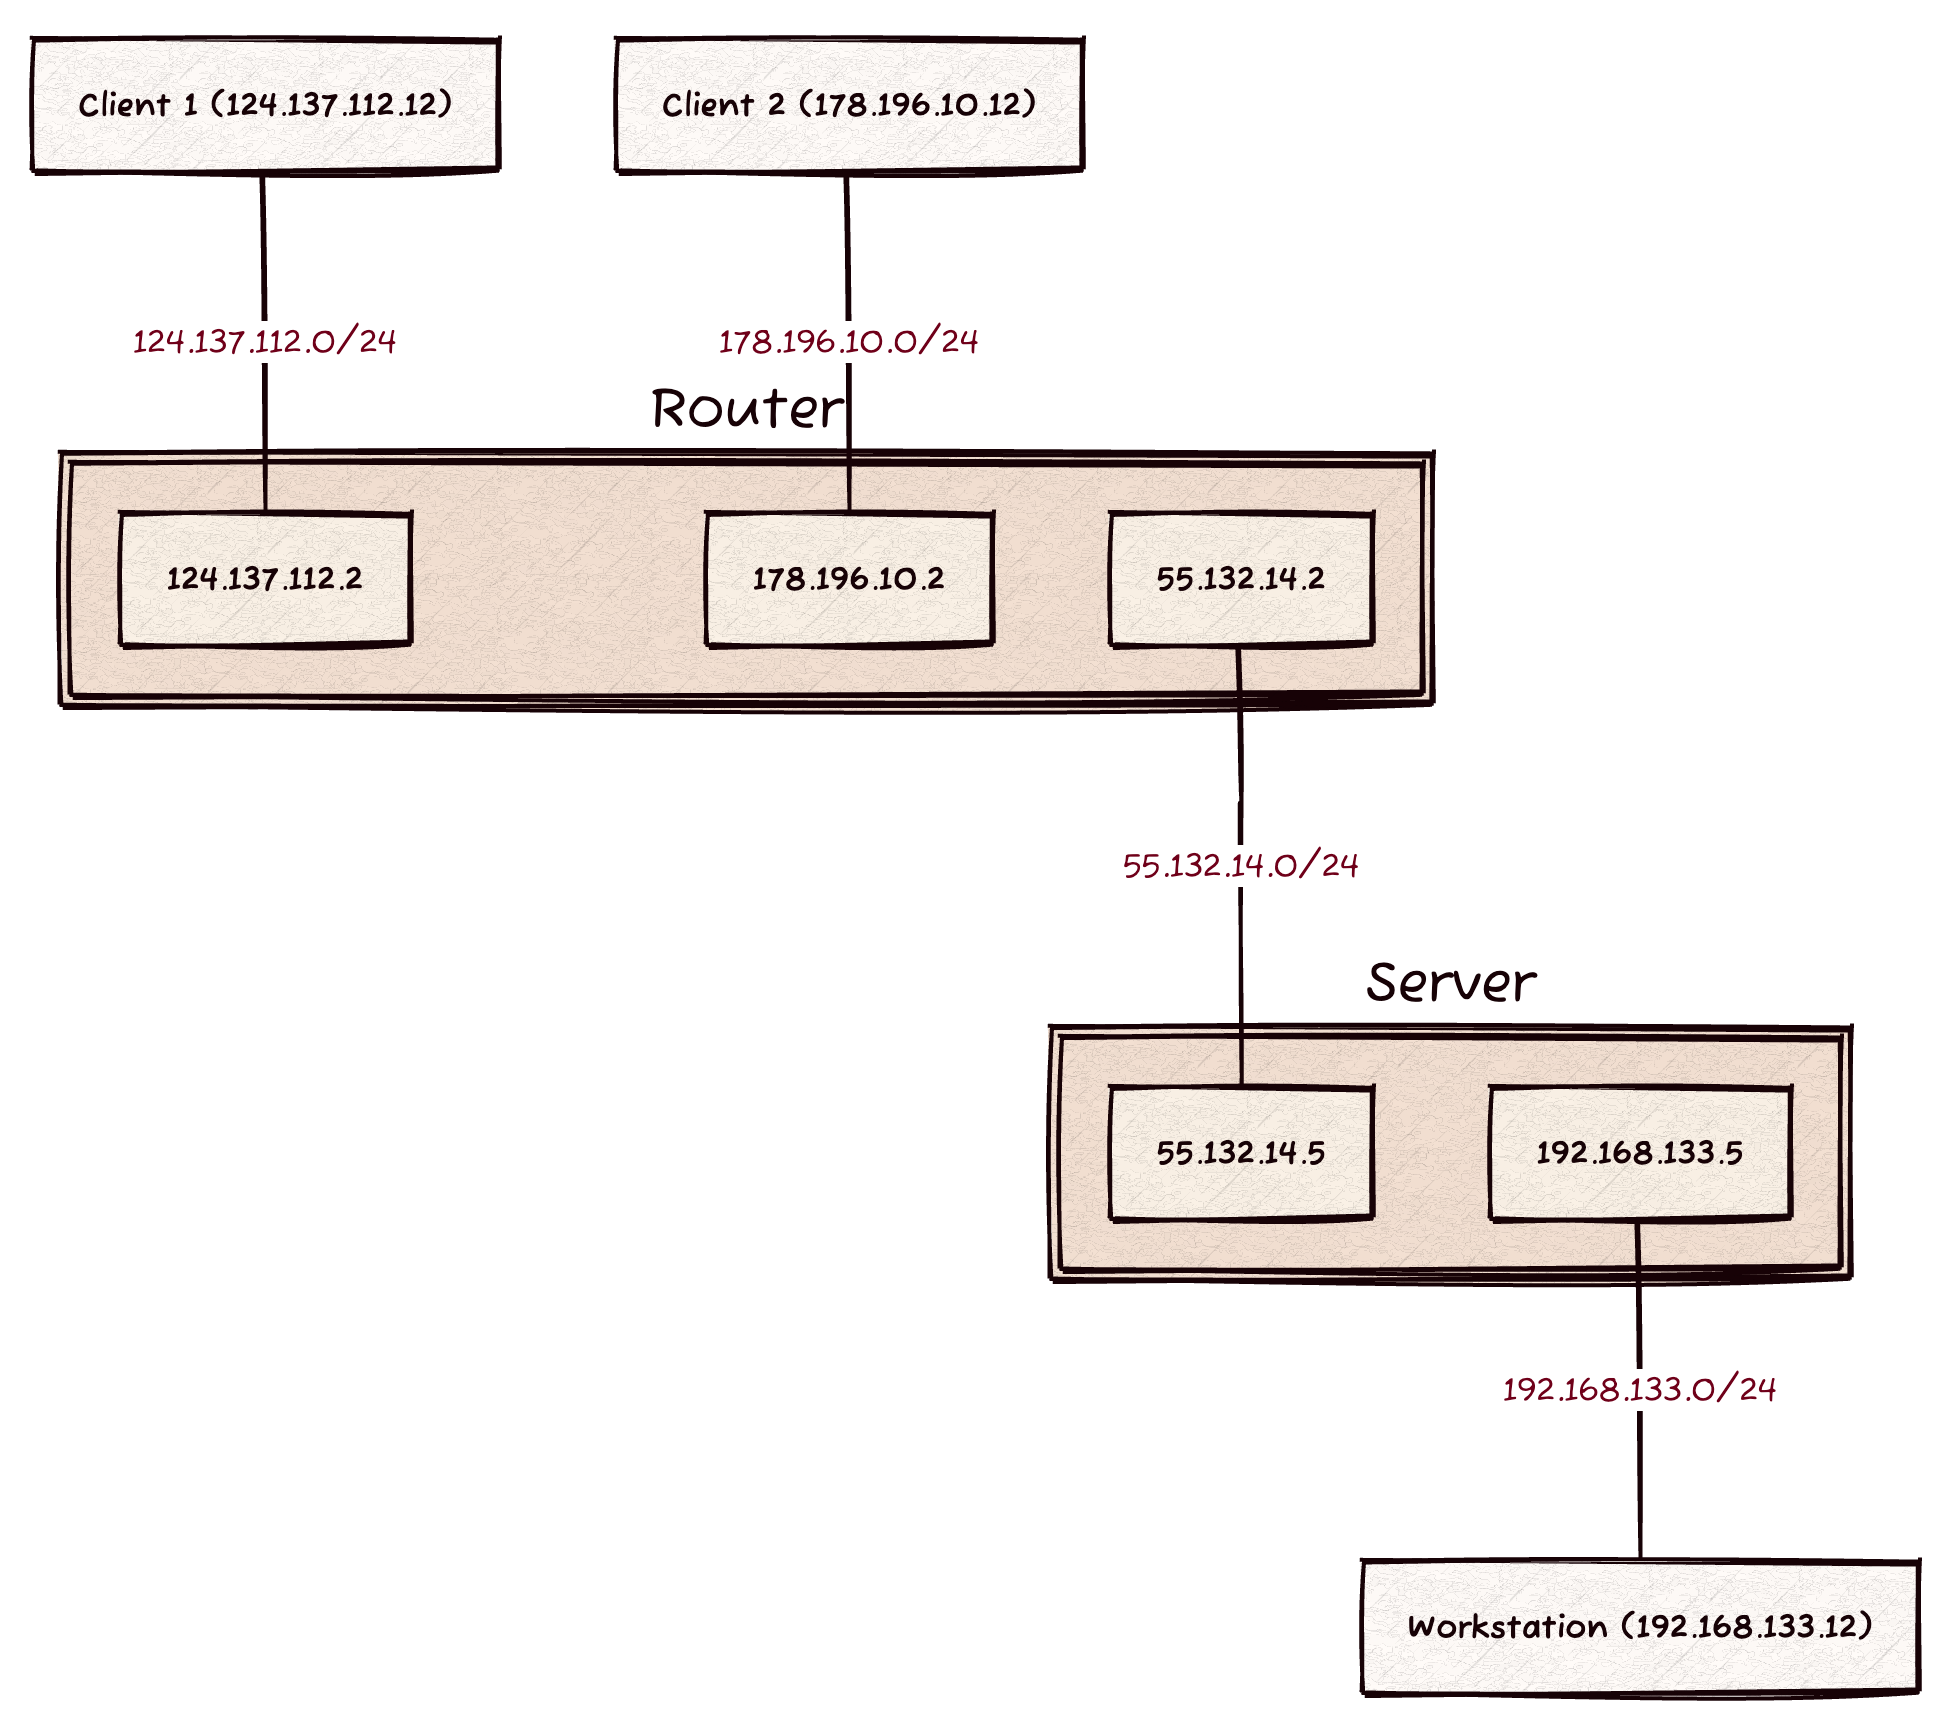
We have four different networks in this example:
192.168.133.0/24: This is our internal corporate network that has aWorkstationrunning. We’d like to enable authorized users totelnetinto this workstation to run experiments.55.132.14.0/24: This is the edge corporate network that connects our corporation to the rest of the world. Practically, we consider it to be an external network. In other words, hosts on this network should not be able to contact theWorkstation.124.137.112.0/24: This is an external network (i.e., over the Internet) whereClient 1resides.178.196.10.0/24: This is another external network withClient 2. Note: adding support for more than a single client is optional.
Scope
Our main goal in this project is to enable Client 1 to communicate with the Workstation through a VPN tunnel. We assume the client is an employee of the company and thus has proper authorization to connect to the corporation’s edge VPN server. Throughout this process, we will investigate our protocol design and find out ways in which an attacker can exploit it. Consequently, we will add options to strengthen the protocol to counter such vulnerabilities.
Also, since we cannot cover everything, we will forgo strong encryption and authentication in this project. Therefore, we will not verify the VPN server’s certificates nor are we going to ask our user for authentication information. To make things worse, we will use a simple xor-based encryption with a weak symmetric key. When doing a security analysis of our design, we already know that this encryption is weak, so better not dwell on it.
You are welcome to add your own authentication and encryption schemes, but they are not required for this project. However, please don’t roll your own cryptography: it will probably suck! Use well established and well studied libraries.
The Protocol
WireChild uses UDP as its transport protocol, so we encapsulate each packet running through the tunnel inside of an xor-encrypted UDP packet. The client and the server use standard UDP sockets to setup the protocol and then carry all VPN traffic from the client to the edge VPN server.
Visually, this looks like the following:
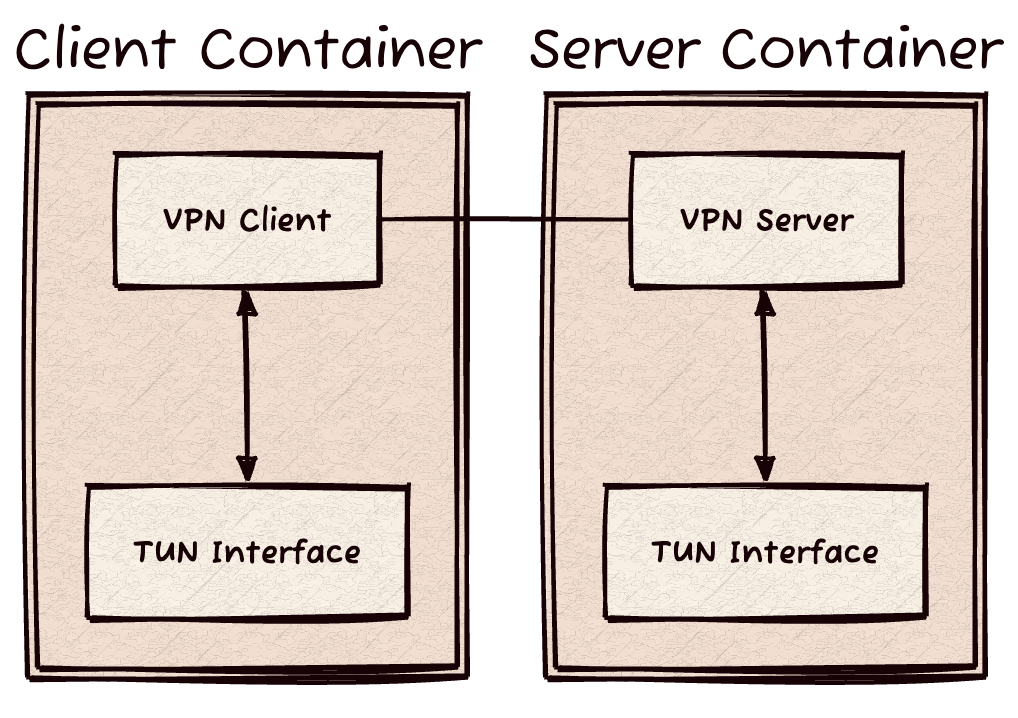
We will configure the client container to send all outbound traffic to the TUN interface. At the TUN interface, we run the WireChild client that performs encapsulation and uses a standard UDP socket to communicate with the VPN server.
Establishing a Connection
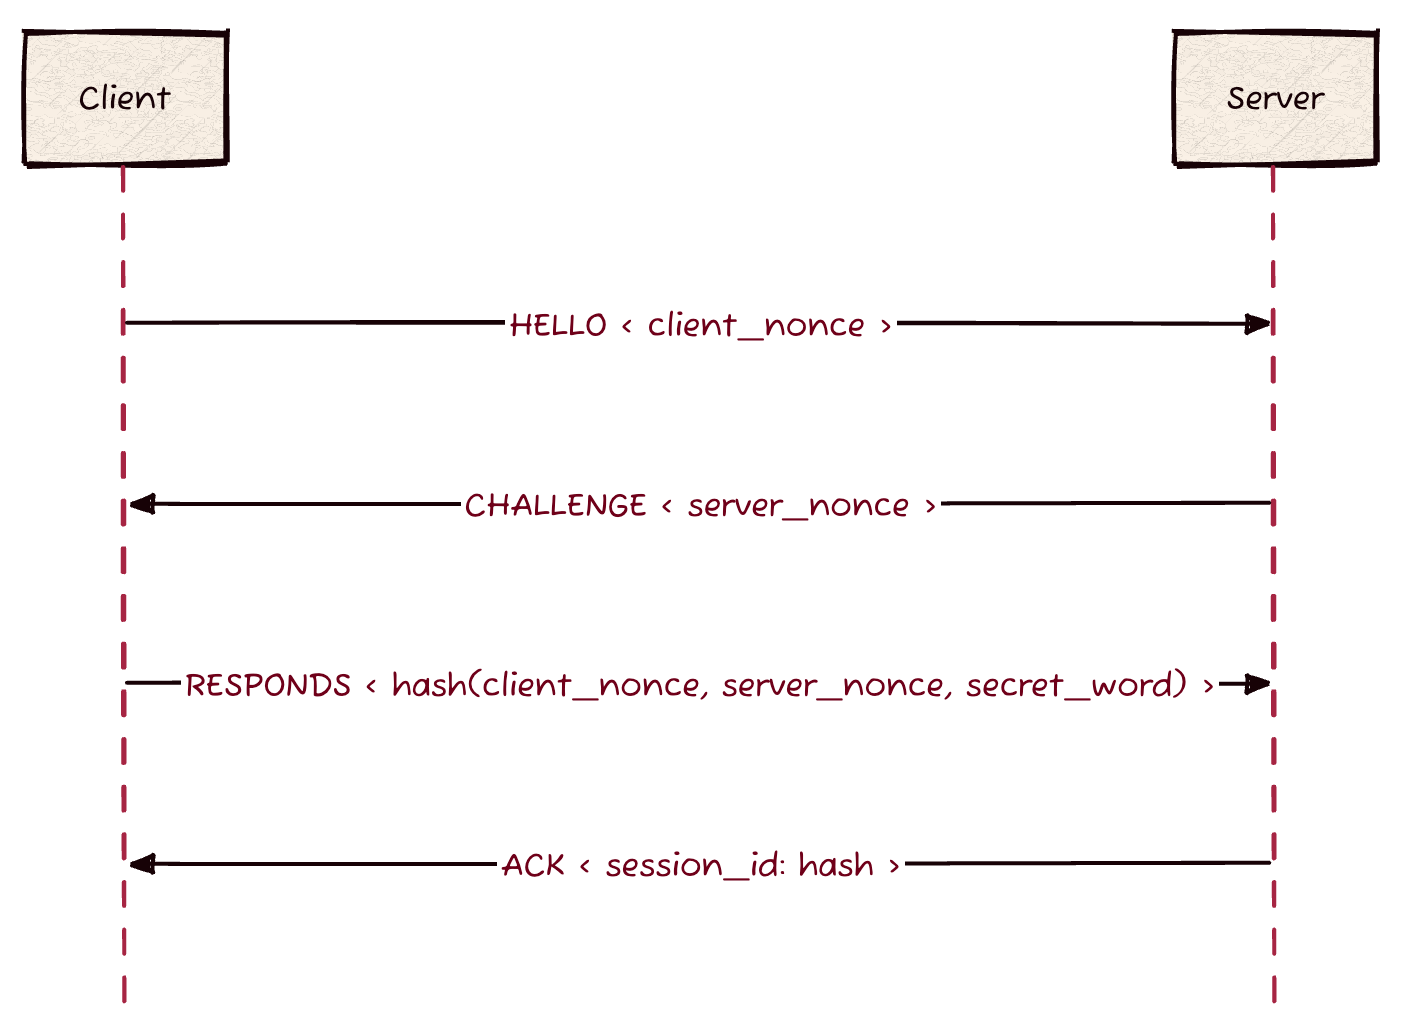
To enable VPN tunneling, the WireChild client and server will negotiate a few options through the use of a simple handshake. First, the client sends a Hello message with a few random bytes. The server will respond with a simple challenge to check if the client knows a secret word. The client will then respond with its response to the challenge. Upon receiving the response, the server will validate the response and then establish a VPN connection.
We call an established VPN tunnel a session. We will give each session a unique identifier so we can map packets traveling through the tunnel to a specific connection. Therefore, both client and the server will need to maintain some state information (i.e., data structures or variables) about the VPN session through which they are communicating.
Here’s a breakdown of the handshake protocol:
Client sends
HELLOand random bytes (we call those bytes a nonce).- Server responds with a challenge.
- The challenge is a server set of random bytes (we call those bytes the server nonce).
The client will compute a simple hash over a secret word, the client nonce, and the server nonce. It will then send it back to the server.
You can pick a simple hash function or grab one from the any libraries (make sure you cite it though).
- The server validates that the client knows the secret word by validating the hash. If valid, that hash will become that session’s unique identifier.
If valid, the server responds with an acknowledgment that we have established a session and we can now send and received packets through the tunnel.
If invalid, the server responds with an error message and drops the client.
Visually, this handshake looks as follows:
Tunnel Packet Header
Since our VPN protocol must support a handshake, not all UDP packets flowing through the tunnel will contain data. Therefore, we need a way to differentiate between different types of packets. Packet can be part of the handshake (and maybe other management packets) or contain data (i.e., other packets in their payload).
To address this issue, each packet traveling through the tunnel will have its own WireChild header. This header looks like the following:
 0                   1                   2                   3
 0 1 2 3 4 5 6 7 8 9 0 1 2 3 4 5 6 7 8 9 0 1 2 3 4 5 6 7 8 9 0 1
+-+-+-+-+-+-+-+-+-+-+-+-+-+-+-+-+-+-+-+-+-+-+-+-+-+-+-+-+-+-+-+-+
|       W       |       C       |    Version    |      Type     |
+-+-+-+-+-+-+-+-+-+-+-+-+-+-+-+-+-+-+-+-+-+-+-+-+-+-+-+-+-+-+-+-+
|             Length            |            Checksum           |
+-+-+-+-+-+-+-+-+-+-+-+-+-+-+-+-+-+-+-+-+-+-+-+-+-+-+-+-+-+-+-+-+
|                        Sequence Number                        |
+-+-+-+-+-+-+-+-+-+-+-+-+-+-+-+-+-+-+-+-+-+-+-+-+-+-+-+-+-+-+-+-+
|                       Session Identifier                      |
+-+-+-+-+-+-+-+-+-+-+-+-+-+-+-+-+-+-+-+-+-+-+-+-+-+-+-+-+-+-+-+-+
|                      Reserved for Future                      |
+-+-+-+-+-+-+-+-+-+-+-+-+-+-+-+-+-+-+-+-+-+-+-+-+-+-+-+-+-+-+-+-+
It contains the following fields:
The character
Win ASCII.The character
Cin ASCII.The protocol’s version number, which is the number 1 in this case.
The packet type (see the packet type section)
The total packet length, including the header and the data.
A 16 bits checksum, computed over the header.
A sequence number for packets that contain data.
The session’s unique identifier generated from the handshake.
32 unused bits and reserved for your own use in extending the protocol.
Packet Type
A tunnel WireChild packet can have one of the following types:
| Type | Name | Description |
|---|---|---|
0x01 | HELLO | Client HELLO packet |
0x02 | CHALLENGE | Server challenge packet |
0x03 | RESPONSE | Client challenge response packet |
0x04 | ACK | Server acknowledgment of challenge packet |
0x05 - 0xD9 | UNUSED | Reserved for extension/future use |
0xDA | DATA | A tunnel packet containing data |
0xDB - 0xFE | UNUSED | Reserved for extension/future use |
0xFF | ERROR | Packet indicates an error in the session or handshake |
As you can see, there are plenty of values left unused if you would like to add extensions to the protocol. Also, the header itself contains 32 unused bits. You may use those to augment the protocol to handle some missing features in this document.
WireChild Specification
The steps below detail how to establish and use a VPN session between a client and the VPN server.
For the sake of the example, assume that the client would like to send an ICMP Echo Request packet to the Workstation. Also, assume that the client’s TUN interface has the IPv4 address 192.168.133.75.
Handshake
In the protocol description below, we assume the each nonce is only four bytes long.
Client sends the
HELLOpacket (type0x01) to the server with its nonce \(N_c\).The server saves \(N_c\) and sends a
CHALLENGEpacket (type0x02) with the server’s nonce \(N_s\)The client computes \(H_c = \mathtt{hash}\left(N_c, N_s, S\right)\) where \(S\) is a secret word that only the client and the server know.
The client sends the server a
RESPONSEpacket (type0x03) containing the computed hash \(H_c\).If the hash is larger than 4 bytes, then feel free to truncate it down to 4 bytes. Again, being cryptographically strong is not a requirement for this project.
- The server verifies if \(H_c \equiv \mathtt{hash}\left(N_c, N_s, S\right)\).
If the verification succeeds, then the server sends an
ACK(type0x04) and remembers \(H_c\) as the client’s session identifier.If the verification fails, the server sends an error packet (type
0xFF) and drops the client.
- After the client and the server establish the session, they can send data packets of type
0xDA. Note that data in our case means another set of IPv4 packets in the payload of the UDP packet (plus theWireChildheader).
At the Client
The client sends an ICMP Echo Request packet. The kernel routes it through the TUN interface to the VPN application.
- The VPN application will create a data packet (type
0xDA). This packet contains aWireChildheader and the ICMP packet itself as the payload.The VPN client retains an increasing sequence number that increments with each data packet sent.
The
WireChildheader will have \(H_c\) as the session identifier field.
- The VPN application encrypts the entire original packet using our weak encryption algorithm (Think why do we not encrypt the header as well?). Visually, this looks like the following:

- The VPN client application sends the
WireChilddata packet encapsulated within a UDP packet.- That UDP packet travels through a standard UDP socket to the server.
At the Server
The VPN server receives the UDP packet through a standard UDP socket.
The VPN server routes that packet through its own TUN interface.
The server’s TUN application reads the packet type, sees it is a data packet and decrypts it. (Hint: Here’s a part of the answer to why the header is not encrypted).
The TUN application forwards the original packet on the local
192.168.133.0/24internal network.- This packet will appear originating from
192.168.133.75.
- This packet will appear originating from
At the Workstation
At the workstation, nothing exciting happens, it simply sees an ICMP packet coming from 192.168.133.75. It considers it coming from the local network and thus responds confidently. That response will go back to the server.
Back at the Server
The server receives the packet on the local network and routes it to the TUN interface.
The VPN server application now becomes a client. The only difference is that we already have an established connection.
The VPN server will encrypt the ICMP Echo Response, put together a data
WireChildheader, and then send it over a UDP socket to the client.
Lastly at the Client
The client receives a packet over the UDP socket. It reads the
WireChildheader and decrypts the reply from the workstation.The client routes the reply packet through the TUN interface. This packet will appear as if it just came from the network (and not from itself on the UDP socket).
The kernel will route that packet to the correct application (i.e., the VPN client application will not see this packet).
Here’s the key insight to understanding this packet traversal. On the same machine (or container), reading and writing to a TUN interface behave differently:
- Read from the TUN interface: This is equivalent to intercepting traffic before it leaves the container. This is where the VPN client application will encrypt traffic and send it through the tunnel.
- Writing to the TUN interface (using the
writecall): This is equivalent to saying the packet just arrived from the network on the TUN interface. So the kernel will route it to its corresponding application (i.e., thepingapplication since it is an ICMP packet).
Implementation
Please note that the WireChild specification leaves room for you to make design decision. I have left some details out on purpose to enable you to think about them and also give your clearer ideas for your security analysis later on. When the specification is vague, make your own design decisions and document them.
Your task in this project is to implement the VPN client and server applications to respect the WireChild’s specifications. This will involve the following:
A
WireChildpacket parser to deal with our custom headers.A simple utility to encrypt and decrypt using the xor operation with the secret word.
A simple utility to compute and verify checksums on received packets. You can port the one we have used in class before.
A UDP socket application on the client to handle incoming tunnel traffic. This includes the handshake finite state machine.
A TUN interface application to handle packets leaving the container.
A UDP socket server application to handle incoming tunnel traffic (is almost a mirror of the client-side application). This will include the handshake finite state machine.
A TUN interface application to handle packets leaving the server container.
State tracking on both client and server to remember the session identifier and the current sequence numbers.
Test cases to check your work and analyze your protocol’s implementation.
Assumptions
To keep things simple, we will make the following assumptions:
- The server will only handle one client at a time.
- Support for more than one simultaneous VPN session is optional but a fun exercise.
- Ask one of the CSSE332 students for help!
- The client and the server have already agreed on a secret word, let’s use
csse341in this case.- Look into the Public Key Infrastructure (PKI) for ways to solve this issue.
- Again, encryption and decryption are simply xor operations with the secret word, nothing fancy in there.
Why use C?
In this section, I give a quick argument on why I advocate using C (or a similar systems programming language) to implement this project. In addition to performance considerations, parsing custom packets in C is really simple.
We need a custom WireChild packet header that we can read from incoming tunnel traffic. Instead of writing serialization and de-serialization functions (as we need to do with pyton), we simply do the following:
Define a structure for the header, here’s an example (feel free to use it as is):
struct wc_header {
  char wc[2]; // The two character determining the protocol (W and C)
  unsigned char version; // One byte for the version number
  unsigned char type; // One byte of the packet type
  unsigned short length; // Two bytes for the packet length (Network byte ordering)
  unsigned short checksum; // Two bytes checksum over the header.
  unsigned seq; // The current sequence number (4 bytes).
  unsigned id;  // The session's identifier (4 bytes).
  unsigned unused; // Unused 4 bytes.
} __attribute__((packed));
The
__attribute__((packed))modifier tells our compiler to keep this structure packed together and avoid adding padding data to it.Once we receive the payload of a UDP packet from the UDP socket, we can simply do the following:
// assume buff contains the data we received from the UDP socket
struct wc_header *wchdr = (struct wc_header*)buff;
Done, we have a
WireChildpacket parser.
Similarly, to create a WireChild packet header, we simply do the following:
Allocate room for the entire
WireChildpacket (header and data). We can simply usemallochere:void *pkt = malloc(pkt_length); // assume pkt_length is computed somewhere struct wc_header *wchdr = (struct wc_header *)pkt; // Done, now fill in the values. wchdr->wc[0] = 'W'; wchdr->wc[1] = 'C'; wchdr->version = 1; wchdr->type = 0xDA; // assume this is data wchdr->length = ntohs(pkt_length); // watch out for network byte ordering. /* Continue filling in fields */That’s it, we have a de-parser for the
WireChildpackets!
Again, you are free to use whichever programming language your are most comfortable with. I simply suggest C because I think it is the most convenient for the purposes of this project and it is one I can help you with the most. While your security analysis might touch upon performance (e.g., for Denial of Service attacks), your implementation need not consider that at this stage.
Implementation Checklist
- Client and Server handshake through a UDP socket.
- Xor-based encryption and decryption with the secret word
csse341. - State maintenance at the client and the server. I suggest you defined a structure
struct sessionto keep everything in it. This will help in implementing the protocol’s finite state machine. - Validation checks on the checksum, the session identifier, and the handshake challenge/response.
- Bidirectional communication through the VPN tunnel after the conclusion of the handshake.
- Security analysis of the protocol and ways to patch it.
- (Bonus) Solve one or more of the vulnerabilities you identify in your security analysis.
- (Optional) Support for more than one active clients.
Security Analysis
After you have completed and tested your implementation, we’d like to think about our design so far and perform an in-depth security analysis. We’d like to look at the WireChild protocol from an attacker’s perspective to understand its vulnerabilities and propose potential solutions. As always, we will have to play a tradeoff game between security, performance, and usability.
Your next ask is then to write a report detailing your security analysis and your suggested mitigation, if any. What threats are you willing to live with? Which are more urgent that we deploy a fix for? You should break down your report into the following sections.
Threat Model
A security analysis always starts with your assumptions about your adversary’s capabilities. While we could think about an all-knowledgeable all-powerful adversary, I am not sure we stand much chance protecting assets from an evil God. So we should think about what a practical adversary can do and what would be the damage in each case. At the same time, we do not want to underestimate our adversary so that we become sloppy in our design. Taking an average CSSE120 student to be your adversary in this case is not a good idea!
In your report, list out the capabilities that you think your adversary can have when analyzing the security and reliability of the WireChild protocol. However, as mentioned before, we already know we’re using crappy encryption. So we are not concerned with an adversary that can break that, we will accept that vulnerability in our implementation.
Here are a few examples to consider. These are just a few things to get you started, you might assume a subset of them or all. But make sure to reason about each and add your own.
- Can your adversary passively eavesdrop on network packets?
- Can your adversary actively change packets in the tunnel? What kind of changes can they make?
- Can your adversary inject packets into the network?
- How much traffic can the adversary send?
After defining our adversary’s capabilities, we should also think about what we are trying to protect. These constitute your assets. Not all assets have the same requirements. Some are high-value assets (like a database server that contains social security numbers), others are low-value (like a web server hosting a trolling website for fun). In our particular scenario, think about what parts of the network you are trying to defend, and what assets in it are the most valuable.
Vulnerability Analysis
Based on your identified threat model and assets, it is now our turn to identify potential vulnerabilities in our protocol and implementation. We will categorize our vulnerabilities as follows:
Cryptographic vulnerabilities: These deal with potential weaknesses in our cryptographic design. We are not concerned with these in this project.
Protocol vulnerabilities: These deal with aspects of the protocol itself, i.e., the handshake, the packet content, the tunnel, etc.
Implementation vulnerabilities: These deal with particulars of our implementation. Your particular implementation might expose a set of attack vectors that would not be otherwise available.
For this project, you should identify at least three vulnerabilities: one protocol vulnerability, one implementation vulnerability, and a third of your choice. For each vulnerability, provide the following:
Name: Give your vulnerability a cool name (e.g., Dirty Cow).
Category: Identify the category to which the vulnerability belongs to.
Severity Level: How severe is this vulnerability? Consider your threat model and your assets.
Description: Give a detailed description of vulnerability.
Attack Example: Give a particular example of a potential exploit. I recommend you draw a sequence diagram similar to the one in the handshake section.
Hint: The
d2diagramming tool enables you to create such diagram with ease.Impact: A denial of service attack is different in its impact from a session hijacking attack. How would this vulnerability impact our system?
Possible remedy: Suggest one (or more) possible remedies to the vulnerability. Describe your remedy in detail and make sure it does not break any existing functionality.
For example, taking the VPN server offline solves all security problems, but that’s not useful!
Real world comparison: Does this vulnerability exist in real VPN protocols? How do they deal with it.
This should be a short paragraph or two, you do not have to dissect existing protocols.
You might want to take a look at some recent CVEs for inspiration.
Summary and Recommendations
Summarize your findings and provide a few recommendations for the protocol and implementation designers. What issues should we fix first, which are more severe and should have the highest priority. And finally, if there are fixes that are impossible under the current design, mention those and suggest modifications to our base protocol that would address those vulnerabilities. These should be modifications to the protocol and not extensions (e.g., change the handshake entirely compared to adding a field to the packet).
Submission
You should submit two things for this project:
- A working implementation, this should be a
tarball(zipfile is fine) of yourcodedirectory. It must contain the following- The
srcdirectory containing your.cfiles. - The
includedirectory containing any header files. - The
CMakeLists.txttop level file, you should leave that unchanged from the starter code. - A
Readme.md(orReadme.txt) file containing instructions to compile and run your application in the docker environment. - A
demodirectory that contains screenshots of your working implementation or a link to a video where you explain how it is running. - Any other scripts your added.
Please do not include compiled objects, i.e., make sure to remove the
builddirectory. - The
Your security analysis report as a PDF.
You can write your report in any editor or format like, but please make sure to submit it as a PDF. You can use the
pandoctool to convert almost anything to PDF.