Lab 02: ICMP and Traceroute
Table of contents
Introduction
This lab continues with a similar setup as in Lab01. However, we’re going to look at two more protocols: the Internet Control Message Protocol (ICMP) and User Datagram Protocol (UDP). ICMP is a protocol that lives somewhat midway between the IP layer and the transport layer, but it’s mostly commonly still considered to be network protocol. For UDP, we will focus on one specific application of UDP, namely traceroute, which allows to find out information about each hop on the path from a source to a destination.
Logistics
We will continue with the same set of tools from Lab01, these are namely:
- Wireshark to visually see packets and protocols.
- Install this on your local machine, so you can see things visually.
If you are comfortable with command line, you can also use
tsharkto observe the same packets and protocols, directly on the server machine.scporrsyncwill prove to be useful to obtain packet captures from the server and download them on your local machine. They should be installed by default on your Linux distribution that you are running.
Learning objectives
After completing this lab, you should be able to:
Identify the data link and network layer protocols.
Capture traffic on a network using
tcpdumpand/orscapyand/orlibpcap.Examine network packets captured on the wire.
Craft and send network packets to achieve a certain objective.
Getting the config
You can find the starter setup for this lab under the 02_Lab02 directory of the csse341-labs repository. If you have set up your private repository correctly, you can fetch the latest version of the labs using the following sequence of commands:
Synchronize with the labs remote using
git fetch upstream.Pull the latest changes from the
mainbranch of the class repository:$ git pull upstream mainPush the starter setup to your repository so you can start modifying it:
$ git add 02_Lab02
$ git push origin main
Generating your .env file
Before we spin up our containers, there are some configuration variables that we must generate. To do so, please run the gen_env_file.sh script from the lab repository directory as follows:
$ ./gen_env_file.sh
If run correctly, you will find the following new files:
.env(hidden file - usels -alto see it) contains yourUIDandGIDvariables.connect_*.sha utility script to connect to each container in this lab.
Network topology
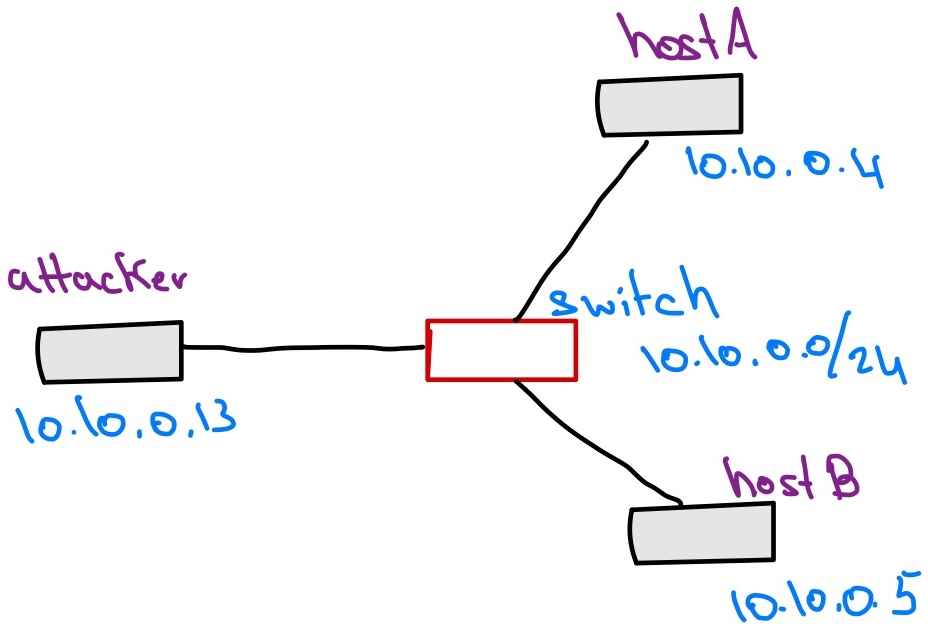
In this lab, we will be working with three machines connected to the same local network. They will live on the same subnet and all can access each other directly. The machines are:
hostAwith IP address10.10.0.4hostBwith IP address10.10.0.5attackerwith IP address10.10.0.13
Exploring ICMP
At this stage, we’d like to look into the ICMP protocol. ICMP is a network control and management protocol that runs on top of IPv4. While it does not do any routing or traffic direction, it is still considered a network protocol (i.e., at the same level as IP), yet it sits at the top of the network layer, right at the edge of the transport layer. ICMP is mostly used for control and management operations in the network.
The ping
Based on what we have observed, when we use the ping command, the sender will send an Echo (ping) request packet, to which the receiver will reply with an Echo (ping) reply packet. To confirm this, go back to the hostA.pcap file that we generated in the very first experiment in Lab01, and examine the ICMP packets in there.
Lab sheet questions
Based on your observations of ICMP in the previous exercises, answer the following question on the lab sheet:
- Draw a simple structure of an ICMP packet, stacking together the different headers that must present in the packet so that communication can happen successfully.
Deciphering an ICMP packet
Next, let’s try to understand what are the content of an ICMP Echo packet. Consider the scenario shown in the figure below.
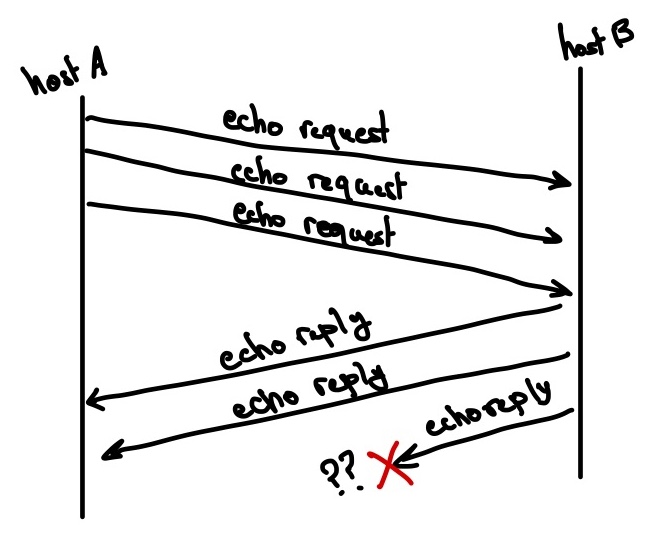
hostA has sent three ping packets to hostB, who has been slow to reply. Even worse, the last packet that hostB sends back ends up lost. The question that is interesting to us is the following:
How can
hostAknow which of itsEcho (ping) requestpackets went without response?In other words,
hostAhas sent three requests, and it is interested in understanding which one of the corresponding replies was lost.
Lab sheet questions
In this step, you should design a simple experiment that does the following:
hostBis capturing packets oneth0; we are only interested in ICMP packets.Hint: To adjust the filter for
tcpdump, you simply can specify which protocol specifically you’d like to watch for. In previous steps, we usedarp or icmp, in this case, we’re only interested inicmp.hostAwill send exactly 3 ping requests tohostB.The
attackermachine should not play any role in this experiment.
You do not have to worry about injecting packet loss for hostB, that is not necessary.
After running your experiments, examine your packet captures and answer the following questions on the lab sheet:
- Describe the setup of your experiment and the commands you used to launch it.
Examine the ICMP packet headers, based on your observations, how can
hostAmatchEcho (ping) replypackets received fromhostBto correspondingEcho (ping) requestpackets that it has sent.Hint: You only need to look at the ICMP header.
Traceroute
Now we come to the fun stuff. In this task, we’d like to do two things:
Reverse engineer a useful networking tool.
Re-implement this tool for fun and profit.
Your next task is reverse engineer traceroute and re-implement it yourself. traceroute is a Unix utility that uses some properties of the IP and ICMP protocols to list all the hops on the route between a source and a destination.
For example, if I want to know the network hops between hostA and 1.1.1.1, then on hostA you can do the following:
(hostA) $ traceroute 1.1.1.1
traceroute to 1.1.1.1 (1.1.1.1), 30 hops max, 60 byte packets
 1  10.10.0.1 (10.10.0.1)  0.082 ms  0.028 ms  0.032 ms
 2  137.112.104.3 (137.112.104.3)  0.360 ms  0.360 ms  0.406 ms
 3  137.112.9.156 (137.112.9.156)  0.132 ms  0.128 ms  0.098 ms
 4  * * *
 5  199.8.48.102 (199.8.48.102)  2.253 ms  2.271 ms  2.239 ms
 6  ae-0.2022.rtr.ll.indiana.gigapop.net (199.8.220.1)  1.974 ms  3.016 ms  1.945 ms
 7  206.53.139.34 (206.53.139.34)  2.457 ms  2.940 ms  2.965 ms
 8  one.one.one.one (1.1.1.1)  2.025 ms  1.989 ms  1.962 ms
Note that your output might be different; network paths often change depending on the state of the network.
Lab sheet question
In what follows, use the tools we have learned to do the following:
- Describe an experiment in which you can capture packets to examine
tracerouteand reverse engineer its operation.- Based on the outcomes of your experiment, how does
traceroutedetermine the hops on the path betweenhostAand1.1.1.1.
Here are a bunch of hints:
You only need to use one machine, say
hostA.It is advisable to use
Wiresharkinstead oftshark.To help you remove packets that we are not interested in, you can use the following
tcpdumpfilter command:(hostA) $ tcpdump -i eth0 ip or icmp and not port 53 -w /volumes/traceroute.pcapThis will filter out DNS packets that we are not interested in; we only care about IP and ICMP.
BIG HINT: Look at the
TTL(or Time To Live) field in the IP header of packets sent byhostA.To follow a certain packet and see only the responses corresponding to it in
Wireshark, right click on the packet of interest, and then selectFollow -> *** Stream, where***refers to a protocol name.Look at the differences between the ICMP packet sent from the destination (i.e.,
1.1.1.1) and how it is different from those sent from hops on the path.In this lab, you are free to choose the programming language that sounds easier to you (most choose
python). I have written a smallscapytutorial for sniffing and forging packets to help you out. You can also useCsockets if you are familiar with them.