Table of contents
- Introduction
- Logistics
- Learning objectives
- Getting the config
- Network topology
- 1. Implementing ping
- 2. Disconnecting the two hosts
- 3. Man in the Middle
Introduction
In this lab, we would like to extend our attack from lab 1 to mount a Man in the Middle (MITM) attack on two hosts on the same network. We will explore further loopholes in the Address Resolution Protocol and use it to breach the integrity and confidentiality of packets on the network. This will also serve as an introduction to IPv4 routing and the TCP handshake.
Logistics
In addition to the tools we set up in the prelab, you will need the following:
- Wireshark to visually see packets and protocols.
- Install this on your local machine, so you can see things visually.
- If you are comfortable with command line, you can also use
tsharkto observe the same packets and protocols, directly on the server machine. scporrsyncwill prove to be useful to obtain packet captures from the server and download them on your local machine. They should be installed by default on your Linux distribution that you are running.nc(netcat) will help us set up a simple client-server application.
Learning objectives
After completing this lab, you should be able to:
- Use
libpcapto capture and manipulate packets on the wire. - Compare performance between different implementations of exploits.
- Conduct a MITM attack on two hosts to act as a router.
- Explore IP routing and TCP set up.
Getting the config
For this lab, we will be using GitHub classroom to get the starter code. Please follow this link to accept the assignment and obtain your own fork of the lab repository.
The first time you accept an invite, you will be asked to link your account to your student email and name. Please be careful and choose your appropriate name/email combination so that I can grade appropriately.
Generating your .env file
Before we spin up our containers, there are some configuration variables that must be generated on the spot. To do so, please run the gen_env_file.sh script from the prelab repository directory as follows:
$ ./gen_env_file.sh
If run correctly, several files will be generated:
.env(hidden file - usels -alto see it) contains your UID and GID variables.connect_*.sha utility script to quickly connect to each container in this lab.
Network topology
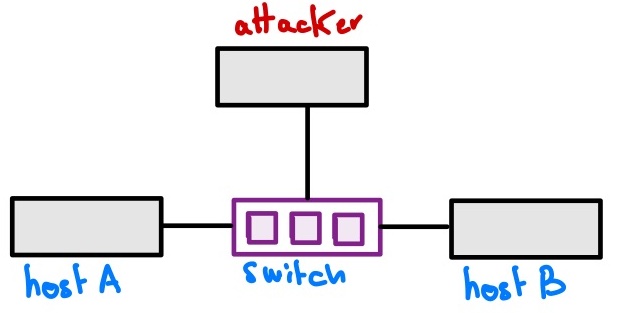
We will start off with a similar topology to that of lab1. We will have three containers:
hostAwith IPv4 address of10.10.0.4hostBwith IPv4 address of10.10.0.5attackerwith IPv4 address of10.10.0.10
Please note that the attacker container is configured to ignore ICMP Echo request packets, and thus will not respond to ping requests.
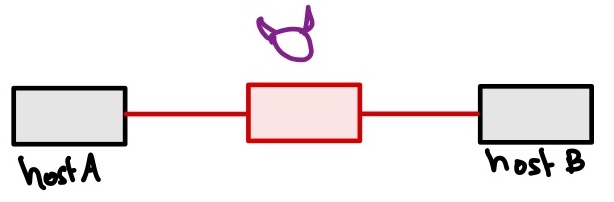
They all exist on the same local network and can talk to each other freely. Our target at the end of this lab is to make the attacker container sit in the middle of hostA and hostB, such that any packet from A to B or B to A, will be intercepted by the attacker; this is referred to as a Man in the Middle Attack (MITM).
Before the attack, the topology looks as follows:
After the attack, it should become:
1. Implementing ping
We will start off with implementing ping again, just to learn how to send packet using libpcap. In your lab2 directory, navigate to volumes/src/ping and look at the source code in there.
The code is structured in the following manner:
ping.c: This contains themainfunction that listens for packets and captures them. Check out thebuild_filter_exprfunction in there. It build a filter expression forlibpcapto only captureicmppackets that are not originating for the machine running the script. This will help avoid infinite loops (Think about why that might happen?)You will not need to edit this file.
ping.cexterns a function calledparse_ip. You can find that function inparse_ip.c.parse_ip.c: This file contains theparse_ipfunction. In here, you should only check if the IPv4 header contains an ICMP subsequent header.This file externs a function called
parse_icmp.cthat would handle ICMP headers.parse_icmp.c: This file is where most of what you want to do will happen. This is where we will extract an ICMP header and then reply to an Echo request if any.
You shall only edit the code in parse_ip.c and parse_icmp.c. The reason why we set them up in this way is to make it easy for you to grab code from here and use it in other parts of the lab.
Task 1: Grabbing the ICMP header
You first task is to trigger the parse_icmp function to execute. You should edit the parse_ip.c file to do the following:
- Check if the IPv4 header contains an ICMP protocol.
- If so, call
parse_icmp. The arguments forparse_icmpare documented in the function’s signature at the top of the file.
This task should not be more than two line of code.
Task 2: Parse the ICMP header
Grab two terminals, one connected to hostA and another connected to attacker, and try to ping the attacker from hostA, you will see that the attacker does not reply. Our goal here is to change that.
  (netsec-01) $ ./connect_hostA.sh
  ┌──(netsec㉿hostA)-[/volumes]
  └─# ping -c1 attacker
  PING attacker (10.10.0.10) 56(84) bytes of data.

  --- attacker ping statistics ---
  1 packets transmitted, 0 received, 100% packet loss, time 0ms
First thing, let’s detect an ICMP Echo request on the attacker’s machine.
Step 1: Print the receipt of an ICMP Echo request
First thing to do is to acknowledge the receipt of an ICMP Echo Request, and print from where it is coming from. Edit parse_icmp.c to do just that.
You will need to check the type of the ICMP header received, and then just print the originating source IPv4 address of the packet; Hints are in the comments for step 1 under the TODO label.
Note that to run ./ping.bin, you will need to provide the MAC address of the interface on which you should be running. To do so, you can either write it manually, or you can read it from the system. Each interface’s MAC address is store in a pseudo-filesystem on Linux under /sys. Specifically, if you read the entry /sys/class/net/eth0/address, you would be accessing the MAC address of eth0.
Therefore, to run the code, you would do something like: ./ping.bin $(cat /sys/class/net/eth0/address)
If you implement this correctly, you should see something like (skip the ./connect_*.sh part if you are already on those machines):
  (netsec-01) $ ./connect_attacker.sh
  ┌──(netsec㉿attacker)-[/volumes/src/ping]
  └─# sudo ./ping.bin $(cat /sys/class/net/eth0/address)
  [LOG:ping.c:main:75] ./ping.bin (27): Found device: eth0
  [LOG:ping.c:main:103] Running ping.bin with filter icmp and (not ip src 10.10.0.10) and (not ether src 02:42:0a:0a:00:0a)
  [LOG:parse_icmp.c:parse_icmp:44] Received ICMP Echo Request from 10.10.0.4
while from hostA:
  (netsec-01) $ ./conect_hostA.sh
  ┌──(netsec㉿hostA)-[/]
  └─# ping -c1 attacker
  PING attacker (10.10.0.10) 56(84) bytes of data.

  --- attacker ping statistics ---
  1 packets transmitted, 0 received, 100% packet loss, time 0ms
Step 2: Send the reply
Now, we know that we have found our ICMP Echo Request, so we must send our reply. The steps involved in doing that are following:
- Create space of the new packet to be sent.
- Set the content of the Ethernet header.
- Set the content of the IPv4 header.
- Set the content of the ICMP header.
- Send the packet.
However, it is tedious to do all of that every single time. So we’ll do a little hack. Our ICMP Echo Reply looks exactly the same as the Echo Request, except for some fields changed here and there, so we will first copy the old packet into the new one, edit it, and then send it.
Note that there’s a reason why we carried the len field with us all this time. We will need it to know how much memory to allocate.
So first, allocate room for the return packet and do some error checking:
  retpkt = mallock(len);
  if(!retpkt) {
    print_err("PANIC: No more room in memory\n");
    exit(99);
  }
Next, copy the packet received into the newly created one:
memcpy(retpkt, pkt, len);
Now, let’s start editing, it is useful to grab the headers, so let’s just do exactly that:
  eth_hdr = (struct ether_header*)retpkt;
  iphdr =     // TODO: Add code to get the IPv4 header IN THE NEW PACKET.
  reticmp =   // TODO: Add code to the ICMP header IN THE NEW PACKET.
First, let’s start the Ethernet header. This is now going from attacker to hostA, while the one we received came from hostA to attacker, so we’d need to swap the MAC addresses. Note that we have our own MAC address in the eth_addr structure at line 32.
Copy source host into destination host:
memcpy(eth_hdr->ether_dhost, eth_hdr->ether_shost,
    sizeof eth_hdr->ether_shost);
Copy our MAC address into the source host:
memcpy(eth_hdr->ether_shost, eth_addr->ether_addr_octet,
    sizeof eth_hdr->ether_shost);
Next, swap the source and destination IPv4 addresses, this is a bit easier since we just swap out pointers rather than needing to copy memory:
tmp_addr = iphdr->daddr;     // save destination address.
iphdr->daddr = iphdr->saddr; // set destination to source.
iphdr->saddr = tmp_addr;     // set source address to previous destination.
Finally, we need to adjust the ICMP header’s type and code fields:
reticmp->type = // TODO: set the appropriate type.
reticmp->code = // TODO: set the appropriate code.
Finally, send the packet and free the memory:
pcap_inject(handle, retpkt, len);
free(retpkt);
Now, compile the code on the netsec-01 server using make, then run it on the attacker machine, and from hostA, try to ping the attacker.
Lab sheet questions
On your lab sheet, answer the following questions:
- Was your
pingsuccessful? (Hint: it should not be!) Grab a packet capture from
hostAand examine it usingtsharkorWireshark. You will see that your Reply packet was received byhostA, but it was dropped.Examine the packet and its headers, why did
hostAdrop the packet?Hint: Wireshark will highlight the problem for you, you can’t miss it!
- What is the use of the field that caused the problem?
Step 3: Fixing the problem
Finally, let’s fix the problem from step 2. First, read the RFC for the ICMP headers here, specifically focus on the description of each field.
To help you out, util.h contains a function called chksum that computes the required value over a header, starting from the start of header. However, it requires us to pass it the pointer as to pointer to two bytes, instead of a pointer to a header.
For example, to use chksum over the reticmp structure from before, we would do something like:
chksum((uint16_t*)reticmp, len - sizeof *eth_hdr - sizeof *iphdr);
Note that we need to apply this function on all the bytes of the ICMP message, include the random data at the end, which is why we use len - sizeof *eth_hdr - size *iphdr.
Now, before you send the packet, recompute that field, set it in the ICMP header, and then send the packet (make sure to do what the RFC above tells you to do before the computation). Your code would look something like:
// Do something from the RFC
reticmp->/*field name*/ = chksum((uint16_t*)reticmp, len - sizeof *eth_hdr - sizeof *iphdr);
Yes the name of the function in util.h tells you exactly what you are looking for!
Finally, we need to do the same for the IPv4 header, you can reuse the same process as above, only replace reticmp with iphdr. However, we only need to do it over the header itself, not the rest of the protocols, so it would look like:
// do something similar to above from the RFC
iphdr->/*field name*/ = chksum((uint16_t*)iphdr, sizeof *iphdr);
Once that is done, recompile and test again, you should see something like the following:
  ┌──(netsec㉿attacker)-[/volumes/src/ping]
  └─# sudo ./ping.bin $(cat /sys/class/net/eth0/address)
  [LOG:ping.c:main:75] ./ping.bin (37): Found device: eth0
  [LOG:ping.c:main:103] Running ping.bin with filter icmp and (not ip src 10.10.0.10) and (not ether src 02:42:0a:0a:00:0a)
and from hostA
  ┌──(netsec㉿hostA)-[/]
  └─# ping -c2 attacker
  PING attacker (10.10.0.10) 56(84) bytes of data.
  64 bytes from attacker.local-net (10.10.0.10): icmp_seq=1 ttl=64 time=6.30 ms
  64 bytes from attacker.local-net (10.10.0.10): icmp_seq=2 ttl=64 time=4.62 ms

  --- attacker ping statistics ---
  2 packets transmitted, 2 received, 0% packet loss, time 1002ms
  rtt min/avg/max/mdev = 4.623/5.463/6.304/0.840 ms
2. Disconnecting the two hosts
Phase one: Understanding the ARP cache
We would like to first understand the behavior of the ARP cache at a host. We will start with a simple experiment and packet capture. Spin up your docker environment using docker compose up -d then grab three terminals, two on hostA and one on hostB.
First, let’s check out the content of the ARP table on each container. Run the following command on each host and check that the content of the ARP table are empty.
(hostA) $ arp -a -n
You should not see anything in the table on either host. If there is anything in the table, you can flush it using ip -s -s neigh flush all.
Starting from an empty ARP table, let’s first ping hostA from hostB, while at the same time capturing traffic on hostA, as follows:
(hostA) $ sudo tcpdump -i eth0 arp or icmp -w /volumes/phaseone.pcap
and then from another terminal on hostA,
(hostA) $ ping -c1 hostB
After the ping is successful, stop tcpdump and look at the packet capture. For this to make sense, please do not let tcpdump run for long after the ping stops, otherwise it will skew the results.
Check the content of the ARP cache on both hostA and hostB using arp -a -n.
Lab sheet questions
By examining the content of the ARP caches on hostA and hostB, and looking at the packet capture, answer the following questions:
- How many ARP request were sent from
hostAtohostB? - What are the content of the caches on both
hostAandhostB? - Based on your observation, what did
hostBdo when it received the ARP request fromhostA? - Describe in a few sentence the steps taken by
hostBwhen it received a request fromhostAfor its MAC address. - Based on your observations, assuming ARP caches are empty, what can a malicious host do to poison the ARP table of a host on the network?
Phase two: Forging replies
Our goal now is to experiment with happens when a host on the network sends unsolicited ARP replies for a fake IPv4 address that it doesn’t own. Our first goal for the attacker is to convince hostA that it is (i.e., the attacker) hostB, by creating a fake mapping in hostA’s ARP cache that maps hostB’s IPv4 to attacker’s MAC address. In simpler words, we would like to trick hostA into thinking that attacker is hostB, so that it sends its traffic there instead of the intended destination.
We would like to investigate the impact of sending forged ARP requests in two cases:
- The ARP cache on our target (i.e.,
hostA) is empty. - The ARP cache on our target (i.e.,
hostA) is already populated.
Lab sheet questions
- Describe the experiment that you would like to setup to evaluate the impact of forged ARP replies. Your experiment must be able to address the following requirements:
- Use appropriate packet captures to show the impact of ARP replies forged from the attacker to
hostA. - Show the impact of the forged request on the ARP cache under different scenarios.
- Analyze if and when the attack might be successful, and what happens if
hostBstarts communicating withhostAall of a sudden.
- Use appropriate packet captures to show the impact of ARP replies forged from the attacker to
Once you have designed your experiment, please check in with your instructor that your setup is able to address all the specifications above.
HINT:
ARP has a few implementation-specific behaviors that are not specified by the RFC. To help us understand those behaviors better, here’s a little experiment. Grab a terminal window on hostA and make sure the ARP cache is empty (by running ip -s -s neigh flus all).
Now try to ping a non-existing host on the network (with no attack running), and then examine the content of the ARP cache using arp -an. You will see that hostA will create an incomplete entry for the unknown host, even if that host did not reply to its requests.
┌──(netsec㉿hostA)-[/]
└─# arp -an
? (10.10.0.12) at <incomplete> on eth0
Using this observation, design your experiment so that you examine the behavior of the ARP cache under these scenarios:
- The ARP cache is empty (for that specific IPv4 address).
- The ARP cache contains an incomplete mapping for the target IPv4 address.
- The ARP cache contains a valid mapping for the target IPv4 address.
Sending forged requests
I have provided you with starter code to forge ARP replies, you can find it under lab2/volumes/src/phase_two in the labs repository.
Add your code to the send_arp_replies function at the top of the file. The code assumes the following naming convention:
targetis the machine you are trying to trick, i.e., the target of the ARP cache poisoning.victimis the machine you are trying to impersonate, i.e., the one you are trying to create a fake mapping for.
Running the exectuable
Since everyone’s IP addresses are different, arp_poison accepts three command line arguments:
- The MAC address of the interface on which it is running.
- The IPv4 address of the victim host.
- The IPv4 address of the target host.
You don’t have to memorize the MAC address for you interface (you can get it from ip a), we will read through the command line. So to run our executable where the victim is 10.10.0.5 and the target is 10.10.0.4, we do:
$ sudo ./arp_poison.bin $(cat /sys/class/net/eth0/address) 10.10.0.5 10.10.0.4
Feel free to put this in a script to avoid typing too much, something like run_poison.sh:
  #!/bin/bash

  # IPv4 address of host you are trying to impersonate.
  VICTIM_IP="10.10.0.5"

  # IPv4 address of host you are trying to trick.
  TARGET_IP="10.10.0.4"

  # Run the attack
  sudo ./arp_poison.bin $(cat /sys/class/net/eth0/address) $VICTIM_IP $TARGET_IP
Then, mark it as executable using chmod +x ./run_poison.sh and run it using ./run_poison.sh.
Success criteria
We consider our attack to be successful if we can convince hostA to send all traffic intended to go to hostB to the attacker machine instead. To evaluate that, we can do two things:
- Check the content of the ARP cache at
hostAduring the attack usingarp -an. - Attempt a
pingfromhostBtohostA, in that case,hostBshould not receive any replies during the attack, since all packets are being sent to theattackerinstead.
Lab sheet questions
Based on your observations, answer the following questions on the lab questions sheet.
Based on your observations, describe the behavior of
hostAwhen it receives an unsolicited ARP reply. Specifically, mention what happens depending on the content of the ARP cache.When would such an attack (using ARP replies) be successful?
Based on your observations, suggest a way to thwart ARP cache poisoning attacks that use ARP replies.
When the attack using ARP replies fails, can you suggest a way to remedy that? In other words, we’d still like to use ARP replies, but we need to force
hostAto take those seriously.- Hint: You might need to send packets on another layer.
- Hint: This is related to the incomplete mapping behavior that we have seen above.
- You do not have to implement this, just suggest a way to make it happen.
Phase three: Forging requests
Another approach to poisoning the cache at our target machine is to use unsolicited ARP requests. We will now repeat the experiment from Phase two, but instead use ARP requests.
I suggest you use your code from phase two and adjust the fields. Here’s a quick way to set yourself up, start from the directory volumes/src/
  (netsec-01:netsec-labs-user/lab2/volumes/src) $ mkdir phase_three
  (netsec-01:netsec-labs-user/lab2/volumes/src) $ cp phase_two/makefile phase_three/
  (netsec-01:netsec-labs-user/lab2/volumes/src) $ cp phase_two/arp_poison.c phase_three/
Then edit the file in phase_three/arp_poison.c to send requests instead of replies. You do not need to edit the makefile as it detects your source files automatically.
Please do not put two files with main functions under the same directory, otherwise the makefile would not be able to generate the executables and you will get linking errors. Use separate directories if you need different executables.
Lab sheet questions
Based on your observations, answer the following questions on the lab questions sheet.
Based on your observations, describe the behavior of
hostAwhen it receives an unsolicited ARP request. Specifically, mention what happens depending on the content of the ARP cache.When would such an attack (using ARP requests) be successful?
If
hostBdecides to start sending ARP requests while you are conducting your attack, what do you anticipate would happen?- You do not have to test this out, just use your judgment as to what you think can happen.
Phase four: ARP gratuitous
In the case both requests and replies do not work, ARP provides you with another way to make announcements, specifically using gratuitous ARP packets. A gratuitous ARP packet is one that a host can send to announce itself on the network (it has useful applications, though not without its drawbacks).
In this phase, we would like to experiment with gratuitous ARP packets to see if they can help us impersonate hostB. We will use the same experimental setup as in the first two phases, except that we will be sending gratuitous ARP packets.
I suggest you copy your code from phase two a new directory (call it phase_four). It is better to start from send replies since a gratuitous packet is slight modification of reply packet.
An ARP gratuitous message is an ARP reply with the following characteristics:
- It is an ARP reply, i.e., its code should be the same as a reply packet.
- It is a broadcast packet, i.e., the target Ethernet address should be \(\mathtt{FF:FF:FF:FF:FF:FF}\).
- The sender and target IPv4 addresses should be the same; they would be the IPv4 address of the host we are trying to impersonate (i.e.,
hostB). - The sender MAC address (in the ARP header) should be the MAC address of the attacker.
- The target MAC address of the ARP header should be the broadcast address (i.e., \(\mathtt{FF:FF:FF:FF:FF:FF}\).
Repeat your experiment with gratuitous messages and record your observations. Recall to clear the cache between experiments using ip -s -s neigh flush all.
Lab sheet questions
Based on your observations, answer the following questions on the lab questions sheet.
Based on your observations, describe the behavior of
hostAwhen it receives an unsolicited ARP gratuitous packet. Specifically, mention what happens depending on the content of the ARP cache.When would such an attack (using ARP gratuitous) be successful?
Thinking like an attacker, which technique of the three would you prefer? Make sure to argue for your answer.
Based on all your experiments, without significant change to the ARP protocol, can such attacks be thwarted?
In your answer, try to hit the following points:
- What is the main weakness of ARP?
- Without a third party intervention, can this weakness be avoided?
- Can someone from the Internet conduct an ARP cache poisoning attack?
3. Man in the Middle
Now, to make things interesting, we would like to use ARP cache poisoning to conduct a man-in-the-middle attack on hostA and hostB. Our goal is to intercept all the traffic going from hostA to hostB, and vice versa.
To achieve that, we must do the following:
Attacker must trick
hostAto maphostB’s IPv4 address to attacker’s MAC address in its ARP cache.Attacker must trick
hostBto maphostA’s IPv4 address to attacker’s MAC address in its ARP cache.The attacker must make sure that the mappings are not dropped and replaced by the legitimate ones.
In this lab, we will intercept traffic between two netcat applications running on hostA and hostB, and play a little prank.
Step 1: Exploring netcat
Let’s first understand how netcat works so we can plan our attack accordingly. Grab three terminal windows, two on hostA and one on hostB.
On hostA start a packet capture for all IP traffic.
(hostA) $ tcpdump -i eth0 ip -w /volumes/netcat.pcap
Then start the server on either host, I will go with hostA:
(hostA) $ nc -l 1234
On the other machine (hostB in my case), connect to the server:
(hostB) $ nc hostA 1234
Now type a few words on hostB and press <Enter>, those same words will show up on hostA where the netcat server is running. It is a simple way of testing if two hosts can connect and exchange packet.
Stop the packet capture, download the pcap file, and open it in Wireshark. You will notice that a new protocol shows up, namely TCP, which stands for Transmission Control Protocol. We will explore TCP in depth later on, all we care about now is to find where the words we have typed are.
Lab sheet questions
By observing the pcap captures, locate the words you have typed during the experiment in the captured packets. You will need to expand the TCP protocol header to be able to see those and answer the following question:
- Grab a TCP packet, and open its corresponding IPv4 header. What is the value of the protocol number in the IPv4 header? Record this value in your notes.
- Which TCP packets contain the words that you have typed during the
netcatexperiment? - For those packets containing the data, open their TCP header, what is the value of the flags field? Which flags are actually set? Record those flags.
Step 2: Disconnecting the hosts
Now let’s launch the attack. We would need to do it on two fronts, one that poisons hostA’s cache, and another that poisons hostB’s cache. You can use whichever technique you’d like.
First, create a directory called exploit under volumes/src and create a file called poison.c in there. You can copy the code from the appropriate attack type you created in the corresponding phase.
There are plenty of ways to do this, so I will leave it to you to design it. You can use multiprocessing, multi-threading, or simply just have one loop generate both attack packets at the same time. But here is the gist:
- Every time, we’d like to generate two packets, one to poison
hostA’s cache, and another to poisonhostB’s cache. - Once you implement this, monitor the ARP caches on
hostAandhostBto make sure you attack is successful (recall to usearp -anto check the content of the ARP cache). - If you make any assumptions about the prior status of the ARP cache, please do state those in your lab sheet. The less assumptions you make, the more successful your attack is going to be. You can start simply and then remove assumptions as you go on.
If you are using a loop to send packets, please do not flood the network all the time. Since the server is shared, we’d like to have a graceful status of the network. In each iteration, inject a small sleep cycle to slow things down a bit. This should not affect your exploit at all. To force your code to sleep for a second, you can use sleep(1); and your code will sleep for a second.
Success criteria
If your attack is successful, the hosts will no longer be able to talk to each other. Make sure to test the following cases:
- ping from
hostAtohostB, no packets should be delivered, but the packets should show up at the attacker. Use tcpdump to make sure they show up. - ping from
hostBtohostA, no packets should be delivered, but the packets should show up at the attacker. Use tcpdump to make sure they show up. - repeat the
netcatexperiment, no connection should be established.
Once you are ready, please show me the outcome of your experiment to verify it is successful. Once you get the green light, move on to step 3 below.
Step 3: Pulling the prank
Our main goal here is to keep hostA and hostB communicating, but to observe their packets and modify their content. To do so, we must sniff all packets that are destined for either host, modify them, and then send them back out.
For our specific purposes, here’s what we want to do:
Listen for TCP packets coming from either
hostAorhostB.If the packet does not contain
netcatdata (Hint: use the flags value you recorded in thenetcatexperiment), skip to step 4.If the packet contains
netcatdata (i.e., it contains messages), modify the content of those messages to our liking.Send the packet back on the wire (use
pcap_inject).
Here’s my breakdown of the approach (you don’t have to stick to it):
Create a directory under
volumes/src/, call itnetcat.Copy the
makefilefrom the phase two into that directory.Create a new file, call it
netcat.c.
This file must sniff packets on the network, i.e., it not only sends
packets, but also wants to capture them. You can use any one of the `print`
files we used in the prelab as starter code, or just the `ping.c` program we
created at the start of this lab.
To make life easier, modify the
filter_exprto only capture TCP packets and ignore everything else, this way you know for a fact that packets you receive are TCP and you don’t need to do involved checks,libpcapwill do that for you.Here’s a suggested filter expression:
tcp and (ip src <IP of hostA> or ip src <IP of hostB>).This will only capture TCP packets generated from either
hostAorhostB.Grab those packets, check their flags, modify those that need to be modified, and then send them back.
Do not add characters to the TCP packet payload, TCP is very sensitive to changes in the lengths of its packets, as we will discuss later in the class. There will come a time where we’ll have to deal with this annoyance, but it’s not today.
Implementation tips
Parsing TCP headers
You would need to parse the TCP header for this task. You can use the struct tcpdhr provided by the Linux kernel for this task. To use it, add this line to the top of your file
#include <linux/tcp.h>
Then, you can use it in the same way we did for all previous packet headers. For example, given a packet pointer pkt, we could do:
struct tcphdr *tcp = (struct tcphdr*)(pkt + sizeof(struct ether_header) + sizeof(struct iphdr));
Here are the content of that structure (vscode should help here as well):
struct tcphdr {
  __be16  source;
  __be16  dest;
  __be32  seq;
  __be32  ack_seq;
#if defined(__LITTLE_ENDIAN_BITFIELD)
  __u16  res1:4,
    doff:4,
    fin:1,
    syn:1,
    rst:1,
    psh:1,
    ack:1,
    urg:1,
    ece:1,
    cwr:1;
#elif defined(__BIG_ENDIAN_BITFIELD)
  __u16  doff:4,
    res1:4,
    cwr:1,
    ece:1,
    urg:1,
    ack:1,
    psh:1,
    rst:1,
    syn:1,
    fin:1;
#else
#error  "Adjust your <asm/byteorder.h> defines"
#endif
  __be16  window;
  __sum16  check;
  __be16  urg_ptr;
};
The fact that flags are actually split into individual bits makes life a lot easier. For example, if I want check if the header contains the PUSH and SYN flags, I could simply do:
if(tcp->syn && tcp->psh) {
  // found it.
}
Of course, you’d need to check for the flags you care about.
Reaching the data
If the packet contains data, then we need a way to access that data, and also know how large it is. This will require us to peek a bit into the IPv4 header and the TCP header. As we will see later in class, TCP headers can have varying length options fields. This makes access the data a bit annoying.
Luckily for us, the TCP header contains a field called the “data offset”, which tells us where the data starts, as an offset from the TCP header. Since by design, the TCP header is always aligned to 32 bits (i.e., 4 bytes), this number is reduce to 4 bits and represents the number of 4 byte words in the header.
For example, if the data offset is 4, then the header is actually \(4 \times 4\) bytes long, which is 16 bytes.
Therefore, to calculate the start of our data segment, we’d do something like:
// assume we created a struct tcphdr *tcp earlier...
char *data = (char*)tcp;
uint16_t tcp_hdr_len = tcp->doff * 4;
data = data + tcp_hdr_len;
Now, you can access the data of the TCP header. That is great, but how do I know when to stop reading data? Now, we need the help of the IPv4 header.
The IP header contains a 16-bit field called tot_len that represents the total length of the packet include the IP header, the TCP header, and the data (excluding the Ethernet header).
Therefore, we can calculate the data length as follows:
uint16_t tot_len = ntohs(ip->tot_len);

// we are making an assumption here, but we'll let it go for now.
// talk to me if you'd like to really know what's going on.
uint16_t iphdr_len = sizeof(struct iphdr);
uint16_t tcp_hdr_len = tcp->doff * 4;

uint16_t data_len = tot_len - iphdr_len - tcp_hdr_len;

// the follow loop iterates over the data and replaces all a's with b's
char *data = (char*)tcp + tcp_hdr_len;
int i = 0;
for(; i < data_len; i++, data++) {
  if(*data == 'a') {
    *data = 'b';
  }
}
You might want to do something a bit better than just replacing a’s with b’s, but you get the gist.
Computing the checksum
The last step we need to worry about is the checksum again (recall the ICMP checksum from the first task in this lab). The TCP header also contains a checksum field, but computing it a bit of a pain. It requires us to peek back into the IP header and obtain a pseudo header from there.
Here’s the description from RFC793:
The checksum field is the 16 bit one's complement of the one's
complement sum of all 16 bit words in the header and text.  If a
segment contains an odd number of header and text octets to be
checksummed, the last octet is padded on the right with zeros to
form a 16 bit word for checksum purposes.  The pad is not
transmitted as part of the segment.  While computing the checksum,
the checksum field itself is replaced with zeros.

The checksum also covers a 96 bit pseudo header conceptually
prefixed to the TCP header.  This pseudo header contains the Source
Address, the Destination Address, the Protocol, and TCP length.
This gives the TCP protection against misrouted segments.  This
information is carried in the Internet Protocol and is transferred
across the TCP/Network interface in the arguments or results of
calls by the TCP on the IP.

                 +--------+--------+--------+--------+
                 |           Source Address          |
                 +--------+--------+--------+--------+
                 |         Destination Address       |
                 +--------+--------+--------+--------+
                 |  zero  |  PTCL  |    TCP Length   |
                 +--------+--------+--------+--------+

The TCP Length is the TCP header length plus the data length in
octets (this is not an explicitly transmitted quantity, but is
computed), and it does not count the 12 octets of the pseudo
header.
To avoid dealing with this fugliness, I have provided you with a TCP header checksum calculation routine below, you just have to use to set the checksum for the TCP header by passing a pointer to the TCP header as well as a pointer to the IPv4 header.
struct pseudo_tcp_hdr {
  uint32_t saddr;
  uint32_t daddr;
  uint8_t zero;
  uint8_t ptcl;
  uint16_t tcp_len;
};

uint16_t compute_tcp_checksum(struct tcphdr *tcp, struct iphdr *ip) {
  unsigned long cksum = 0;
  uint16_t tcplen = ntohs(ip->tot_len) - (ip->ihl * 4);
  struct pseudo_tcp_hdr pseudohdr;
  uint16_t *hdr;
  uint32_t len;

  // make sure this is zero.
  tcp->check = 0;

  // fill up the pseudo header
  pseudohdr.saddr = ip->saddr;
  pseudohdr.daddr = ip->daddr;
  pseudohdr.zero = 0;
  pseudohdr.ptcl = ip->protocol;
  pseudohdr.tcp_len = htons(tcplen);

  // start over the pseudoheader
  len = sizeof pseudohdr;
  hdr = (uint16_t *)(&pseudohdr);
  while(len > 1) {
    cksum += *hdr++;
    len -= sizeof(uint16_t);
  }

  // pseudo header is always 96 bits or 24 bytes, which means len is 0 now.
  len = tcplen;
  hdr = (uint16_t *)tcp;
  while(len > 1) {
    cksum += *hdr++;
    len -= sizeof(uint16_t);
  }

  if(len)
    cksum += *(u_char *)hdr;

  cksum = (cksum >> 16) + (cksum & 0xffff);
  cksum += (cksum >> 16);

  return (uint16_t)~cksum;
}
Reglardless of whether you modify the packet or not, you will need to recompute the checksums for both the IPv4 header and the TCP header, so make sure to do that before you send any packet on the network.
Success criteria
Your attack is successful if you can observe the following behavior (assuming you decided to change all characters to a).
Starting a
netcatonhostA,hostBcan successfully connect tohostA.All packets between
hostAandhostBgo through the attacker machine.Packet not containing data pass through the attacker without modification.
Packets containing
netcatdata are all modified according to your own design (in our case, all characters are replaced witha).If you type words on
hostBand send them, they will show up as alla’s onhostA.
Submission
Once your attack is working, submit your question sheet and code to Gradescope.